

I know, I know… JUnit 5 came out ages ago. But in my defense I was either working on legacy code or non-Java stuff. So when I read about JUnit 5 features, I thought to myself “Yeah, nested tests sounds nice - it’s the only thing I ever really liked about RSpec,” but I didn’t consider any of the other features to be important enough to upgrade such a deeply ingrained library[1]. Well, I was wrong. I did a couple of new projects recently where I used JUnit 5 from the start and found more and more features that I really liked, and that were a huge improvement over JUnit 4. In this blog post I want to show you the one JUnit 5 feature that convinced me that the switch is definitely worth it: Parameterized tests!
One thing you might notice in the examples below: They don’t use the native JUnit assertions but AssertJ’s. When I first started working with JUnit 5 I tried to go without AssertJ for a while but gave up after one week. There are improvements in JUnit 5’s assertions e.g. assertAll and assertThrows were added. But I still find the base assertions severely lacking in functionality.
I’ve always loved parameterized tests. Well, the idea of them anyway. I could never for the life of me remember the syntax of how to define the parameters. At some point I even created an Eclipse code template for it (yes, it was a while ago). So in case you don’t remember, this is what the parameter definition looks like in JUnit 4.
@Parameters
public static Collection<Object[]> data() {
  return Arrays.asList(new Object[][] {
    { 1, 1 }, { 2, 4 }, { 3, 9 }
  });
}
Somewhere below that comes the constructor defining the types and names
private int input;

private int expected;

public SquareTest(int input, int expected) {
  this.input = input;
  this.expected = expected;
}
and even further down the actual test method using those values
@Test
public void test() {
  assertThat(input * input).isEqualTo(expected);
}
So in order to understand the test you need to basically scan the complete file.
Compare this to JUnit 5:
@ParameterizedTest
@CsvSource({
  "1, 1",
  "2, 4",
  "3, 9",
})
void testSquare(int input, int expected) {
  assertThat(input * input).isEqualTo(expected);
}
All nicely together, everything in once place. Easy to read and to extend.
Another huge benefit of this new design is that one class can now contain more than one test method. In JUnit 4, because the parameters were defined only once per class, all methods in the class were using those parameters. Which in practice often led to classes with exactly one test method and multiple test classes for the same class under test. Additionally, changing a test from a parameterized test to a non-parameterized and vice versa is now really easy, you just change the annotation and the signature. In JUnit 4 you had to make changes in multiple places and - in the case of changing from a non-parameterized to a parameterized test - had to split the class into two classes.
In the following section I want to show you some of the different options you can use to define parameters.
How to Define Parameters
@ValueSource
The simplest way to define parameters is @ValueSource. It allows you to pass a list of single values.
@ParameterizedTest
@ValueSource(ints = {1, 10, 38})
void testPositiveNumber(int input) throws Exception {
  assertThat(input).isPositive();
}
Very easy to remember. However, I find myself almost never actually using it because in most cases I pass at least an actual and an expected value in.
@EnumSource
A similar simple annotation is @EnumSource. Contrary to @ValueSource I use it more regularily. One use case I commonly use it for is to check that all enum values are considered by certain methods.
@ParameterizedTest
@EnumSource(value = Roles.class, mode = Mode.EXCLUDE, names = "READER")
void accessToEndpointAllowed(Roles role) throws Exception {
  mockMvc.perform(get("/api/foo")
         .with(authentication(new User(role))
         .andExpect(status().isOk());
}

@ParameterizedTest
@EnumSource(value = Roles.class, mode = Mode.INCLUDE, names = "READER")
void accessToEndpointForbidden(Roles role) throws Exception {
  mockMvc.perform(get("/api/foo")
         .with(authentication(new User(role))
         .andExpect(status().isForbidden());
}
The default behavior is to pass in all enum constants. With the mode option as shown above, it’s possible to either include or exclude constants either by name or regex.
@CsvSource
The annotation I use the most is @CsvSource. You can pass a list of arguments as shown in the beginning of this article. A lot of build-in types are automatically converted as shown below:
@ParameterizedTest
@CsvSource({
        "one,   3, true",
        "one,   2, false",
        "seven, 5, true",
})
void stringLength(String numberAsString, int numberLength, boolean numberLengthEqualsStringLength) throws Exception {
  assertThat(numberAsString.length() == numberLength).isEqualTo(numberLengthEqualsStringLength);
}

@ParameterizedTest
@CsvSource({
        "2019-11-02, P1M",
        "2020-04-28, P8M",
})
void isInDecember(LocalDate date, Period period) throws Exception {
    assertThat(date.getMonth().plus(period.getMonths())).isEqualTo(Month.DECEMBER);
}
There are some additional options e.g. to set a different delimiter.
@MethodSource and @ArgumentsSource
In some cases the static values provided by the @CsvSource annotation are not enough. In those cases you can use the @MethodSource or @ArgumentsSource annotation. They both allow you to programatically create a list of arguments. The only difference is that @MethodSource references the method that generates the arguments by name whereas @ArgumentsSource references a class that generates the arguments. The advantage of @ArgumentsSource is that the referenced class can be easily shared across many test classes.
@ParameterizedTest
@ArgumentsSource(MyArgumentsProvider.class)
void testCollectionSize(Collection<Object> list, int expectedSize) {
    assertThat(list).hasSize(expectedSize);
}

private static class MyArgumentsProvider implements ArgumentsProvider {

    @Override
    public Stream<? extends Arguments> provideArguments(ExtensionContext context) throws Exception {
        return Stream.of(
                Arguments.of(Collections.emptyList(), 0),
                Arguments.of(Collections.singleton(true), 1),
                Arguments.of(List.of(99, 100), 2),
                Arguments.of(Set.of("foo", "bar", "baz"), 3)
        );
    }
}
Those are the main annotations you need in order to define parameters. In regards to running the tests not much changed so I will only briefly cover it next.
Running Parameterized Tests
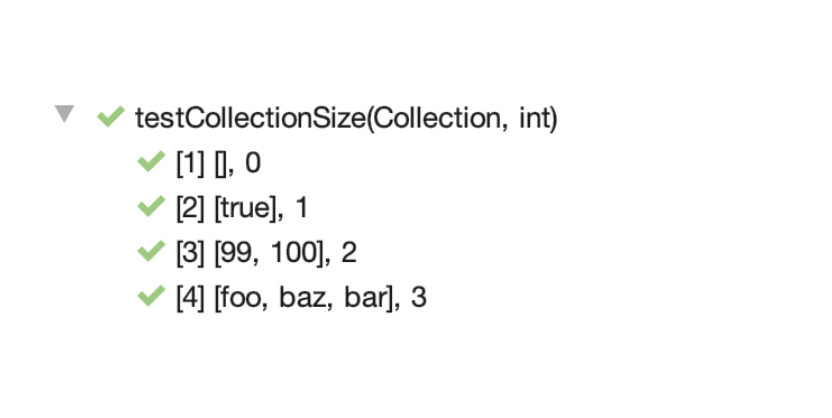
By default, each invocation of the test method is displayed with the current invocation index, followed by the method arguments as shown below.[2]
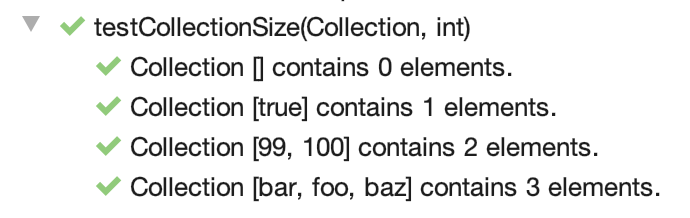
It is possible to change this by specifying the name attribute in the @ParameterizedTest annotation:
@ParameterizedTest(name = "Collection {0} contains {1} elements.")
@ArgumentsSource(MyArgumentsProvider.class)
void testCollectionSize(Collection<Object> list, int expectedSize) {
  assertThat(list).hasSize(expectedSize);
}
which leads to this output:
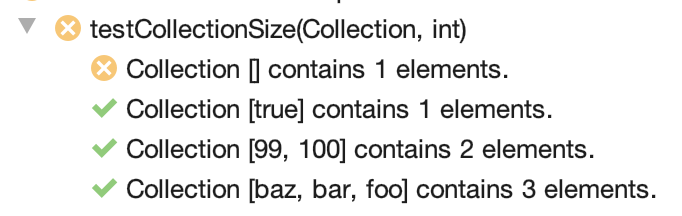
This can be especially helpful when it comes to investigating failed test:
And that’s basically all you need to know about parameterized tests - it’s that easy now.
What about other new features?
There is another change that I am really happy about: The new extension model. It’s a replacement for the old TestRule, MethodRule and Runner extension points. I have written countless rules over the years and - as with parameterized tests - have always struggled to remember the syntax. Admittedly, it’s not something most of us do on a daily basis, but when you do, it has now gotten much easier with the new API. Let’s say you want to start and stop a WireMock server before and after your test. You can now simply implement the functionality in the two obviously-named methods beforeAll and afterAll of the BeforeAllCallback and AfterAllCallback interfaces.
Another new feature I’m making heavy use of are nested tests. It allows for a much better structuring of tests and is especially useful in combination with display names. However, I would not consider upgrading from JUnit 4 solely because of those two new features.
And there is a last new feature I want to mention. I haven’t yet used it but I imagine it would come in handy now and then: Dynamic Tests. I used to work on a code base where JUnit was used for most tests but a very small subset used TestNG because it had the option to generate test cases dynamically based on external input (read a list of URLs from a webservice and run a test case for each URL). This is now also possible in JUnit.
Conclusion
In this article I showed you the one feature that really convinced me to switch to JUnit 5 - parameterized tests - and gave a brief overview over some other improvements. Do you agree that those are the most important ones? Or were you convinced by others?
JUnit 5 is the next generation of JUnit. The goal is to create an up-to-date foundation for developer-side testing on the JVM. This includes focusing on Java 8 and above, as well as enabling many different styles of testing. kreuzwerker is happy to be a Bronze Sponsor in order to support the ongoing efforts and development.
Cover image by Nathan Dumlao from Unsplash
& Logo from JUnit 5
Notes
Running them in parallel also didn’t really appeal to me. ↩
Unfortunately this currently doesn’t work out-of-the box with gradle in IntelliJ. ↩