

TL;DR
If you’re seeking a method to authenticate or authorize requests to your software system from clients with existing AWS credentials, you can employ pre-signed URLs as secure tokens for the GetCallerIdentity operation. Then you can query AWS using the pre-signed URL to retrieve details about the requester’s identity on behalf of the signatory. The pre-signed URL is temporary and is only valid for the specific request, ensuring the safety of the client’s credentials while securely sharing their IAM identity. AWS is responsible for validating the credentials, a process we trust them to handle accurately. If you didn’t get the TL;DR, please don’t be discouraged. In this blog, I would like to show you how to build your authentication mechanism that reliably verifies IAM identities. I will also get into the details of how it works, including what HMAC authentication is and how AWS SigV4 utilizes it. Last but not least, I will discuss how we can leverage pre-signed URLs as a proxy for an identity token. Let’s get to it.
Note: We are largely talking about stateless requests. Traditional applications will use session-ids to carry authentication over across multiple requests.
Problem Statement
It is a bright spring day, and you are taking a walk in a park. You come up to a beautiful pond; the water is clear, and you can see the fish swimming, their figures hovering over the rocky bottom. The rays of light marbling the shiny stones through the waves pull your thoughts to your most ambitious software yet. It has been months in the making, and everything looks perfect. You’ve created a shiny new TCP protocol in a shiny new data center, like the stones in the pond below. All of a sudden, it occurs to you that all your clients are running on AWS. You wave the thought away: “I don’t need to build a lot of tooling for security; AWS will take care of that for me.” You know deep down that you don’t want your clients to go through the hassle of managing credentials; they should somehow be able to use their IAM credentials to identify themselves. But how?
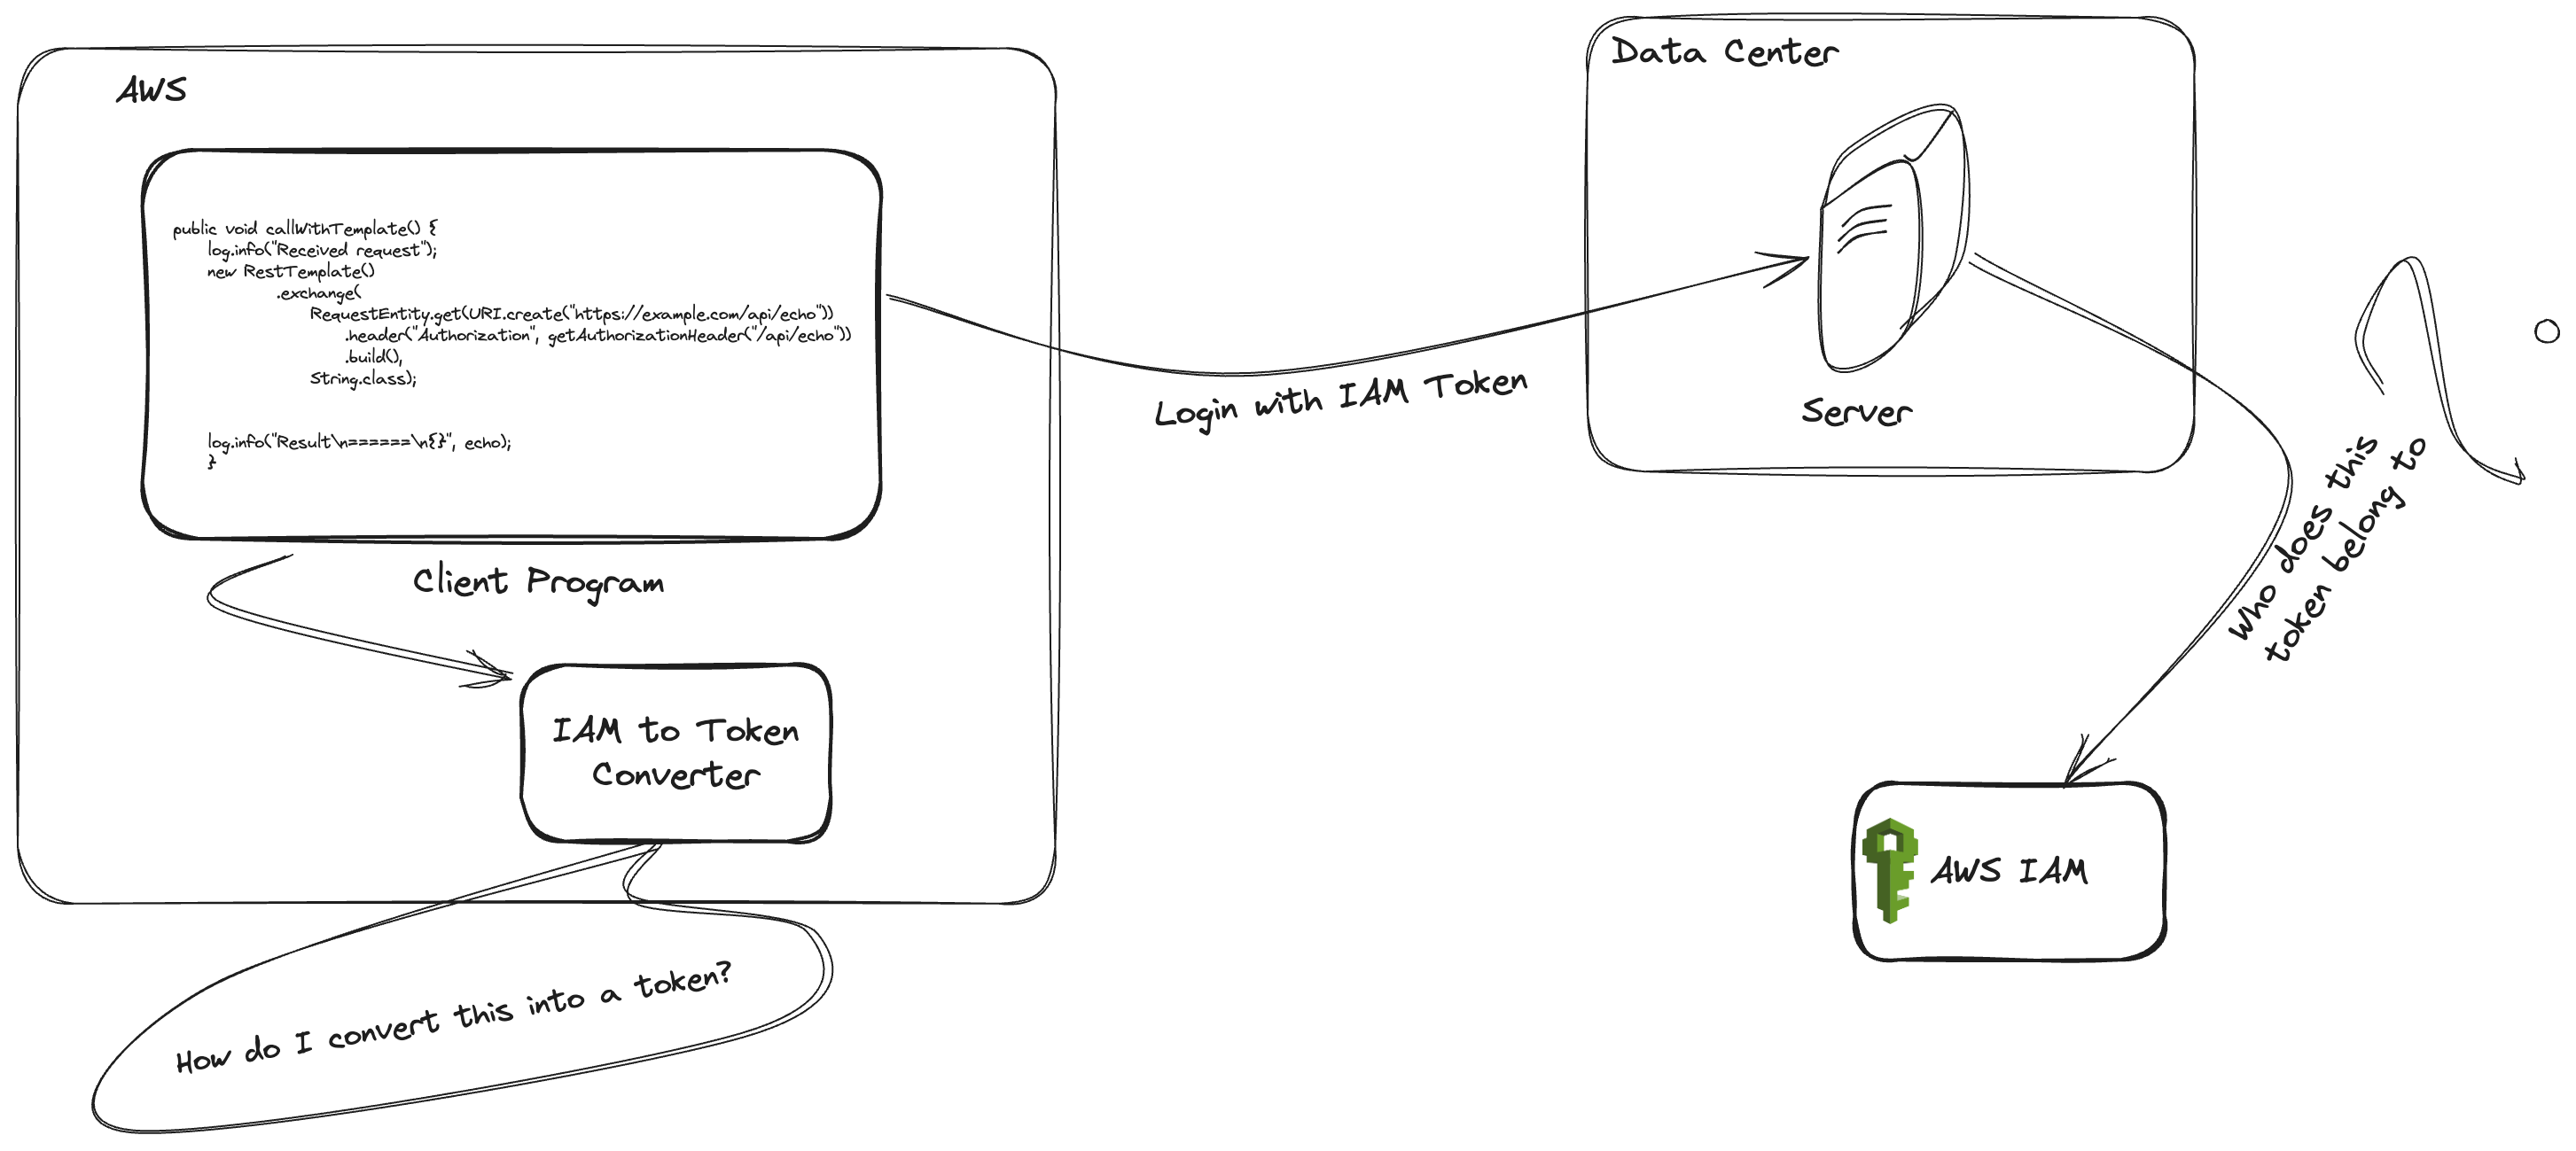
Diagram 1: Problem statement, how to convert IAM credential to a token
AWS has become ubiquitous these days. Even when applications do not run entirely in AWS, some workloads are dependent on it, whether the application is using S3 as storage or is utilizing one of the many machine learning offerings from AWS. And because one needs credentials to access and manage AWS resources, IAM credentials are as ubiquitous as AWS itself. It makes sense to support login with IAM. If your software is running on AWS, say behind an API gateway, AWS might be able to help. Especially if you are using REST API on API Gateway, you are taken care of. However, if your application is running on the HTTP counterpart there is some gaps to fill. More specifically, cross-account IAM authentication on HTTP APIs is only supported through assuming roles.
What I would like to help you solve today is generic. Simply put, I want you to be able to authenticate clients using their IAM credentials. What you need is to somehow convert their IAM credentials into a token, something that resembles a JWT. Clients would need to share their IAM identities without exposing their actual credentials. For obvious reasons, the client sharing their actual IAM credentials is out of the question. That would be plain dumb. The tokens should safely identify the client without exposing their secure information.
On the other side, your software will need to validate these credentials in a trustworthy manner.
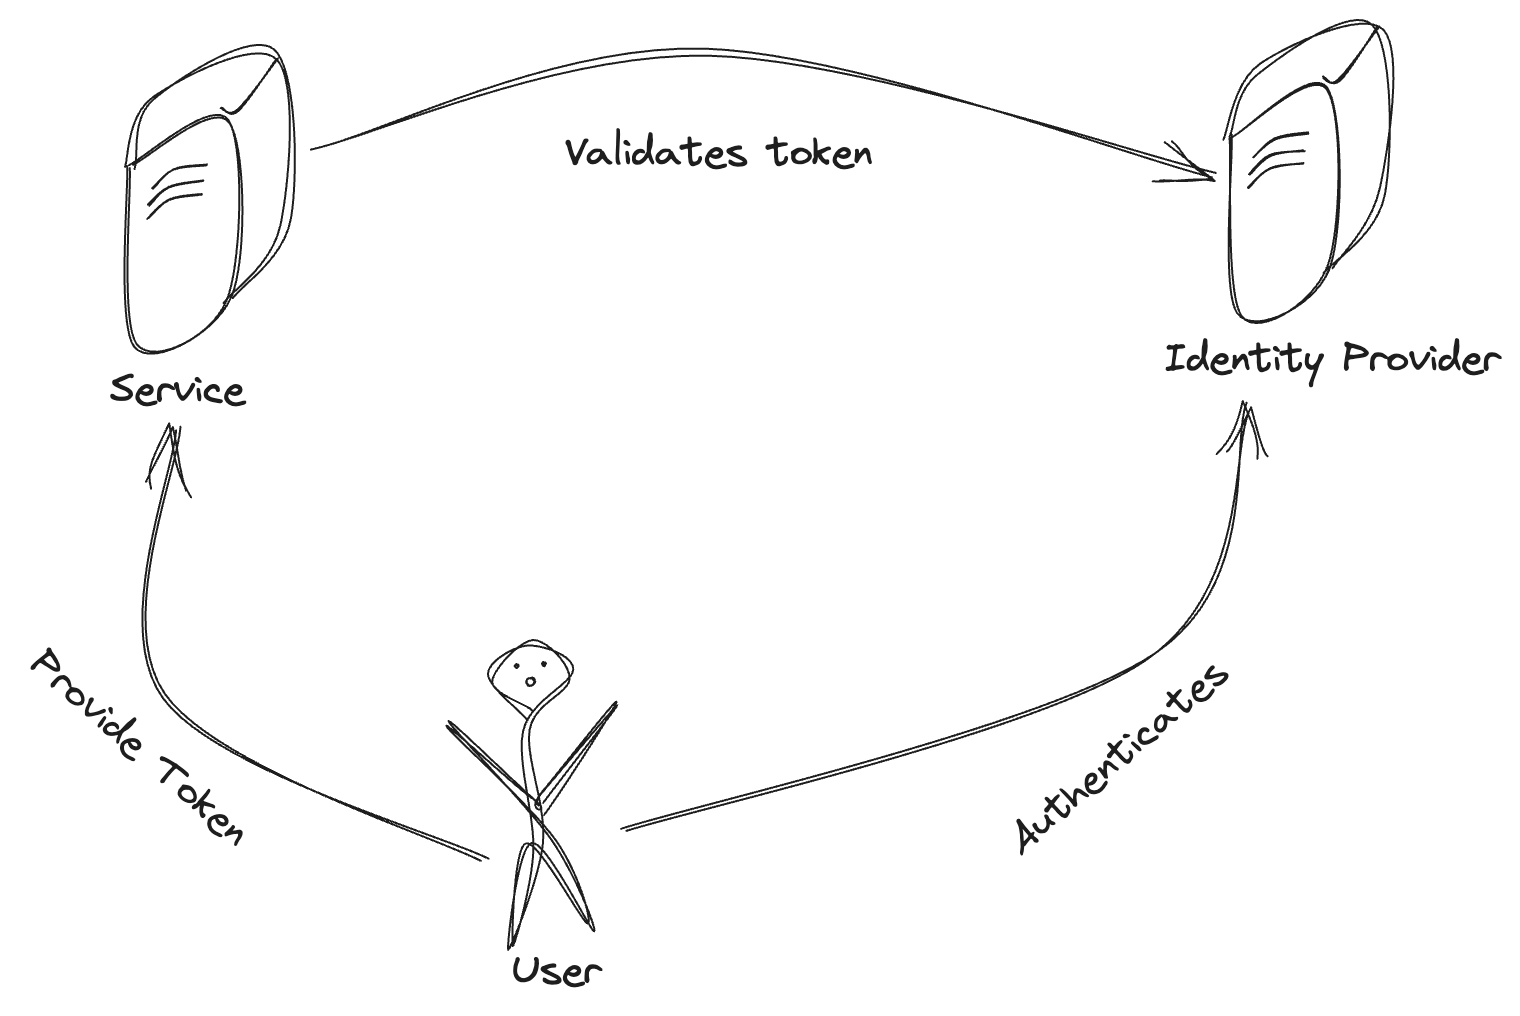
Diagram 2: Identity federation flow
If you look closely and add some imagination, the first diagram (Diagram 1) looks like identity federation. The diagram above (Diagram 2) shows how a typical flow works in federated identity provisioning. Once a user authenticates themselves to an identity provider, they get a token in exchange. This token can take different forms. One of the popular means is the aforementioned JWT token. This token is able to identify a user. The service (your shiny new software) will then use mechanisms provided by the identity provider to validate the token. AWS Cognito or AWS Identity Center support utilizing these means to provision users with IAM identities. You can use your Active Directory, Google Account, or any other compatible identity provider to acquire IAM credentials. What you need now is the opposite use case. You would like to exchange IAM credentials for a verifiable token. This will effectively turn IAM into an identity provider.
Solution
While there is plenty in the way of converting various identities (the likes of Google, Facebook, and Active Directory) into an IAM credential, AWS does not (yet) provide any official means to convert IAM credentials into a verifiable token. At least I couldn’t find it. So, I went looking and found something that works very well. In fact, that is how MongoDB atlas and Vault support authentication with AWS IAM. It boils down to pre-signed URLs and the GetCallerIdentity API operation.
I am sure everyone who worked with the AWS CLI used aws sts get-caller-identity command to either make sure we have the right credentials set, or to validate you have any credentials at all. The GetCallerIdentity endpoint returns the principal arn (the assumed role arn or user arn), account, and user id of the caller. Here is an example response in JSON.
    {
  "GetCallerIdentityResult": {
    "Arn": "arn:aws:sts::123456789:assumed-role/TestRole/amanuel.mekonnen@kreuzwerker.de",
    "UserId": "IDONTKNOWIFISHOULDSHARE:amanuel.mekonnen@kreuzwerker.de",
    "Account": "123456789"
  },
  "ResponseMetadata": {
    "RequestId": "<some-uuid>"
  }
}
When calling AWSs APIs, you must authenticate by signing the request using your IAM credentials. This is what AWS calls AWS SigV4. The AWS CLI and AWS SDKs do this for you behind the scenes. AWS SigV4 is a version of HMAC, Hashed Message Authenticated Codes. HMAC is an implementation of MAC with additional security measures.
HMAC is based on creating a signature that achieves two goals. It acts as an integrity check as well as authentication. In the next section, I will give you a summary of the AWS authentication and pre-signed URLs along with some clue about HMAC. If you already know about HMAC and pre-signed URLs, please skip right over to the Implementation Section.
Concepts
HMAC
To make a point for HMAC, we first need to discuss some other methods of authentication. A very basic means to authenticate yourself when making a request is to use the appropriately named Basic authentication scheme (RFC 7617). You have a set of credentials, a user identifier (username, email, etc), and a secret shared key (password, API key, etc). In the basic authentication scheme, you simply share your credentials along with your request. This, however, is very insecure as the user identifier and secret are passed over the network in an unencrypted form.
Assume the following: Client → “Hello”[Base64(username:password)] → Server. In this interaction, if an attacker was able to get the request (by eavesdropping, DNS spoofing, or maybe from exposed logs on the server side) the attacker gains access to the plaintext password. This is clearly an issue. This does not just apply to Basic Authentication. API token authentications are also a version of Basic authentication. Bearer tokens, while having an important distinction, are also vulnerable for the same vulnerability. Secret information is shared in unencrypted form.
To avoid this most serious flaw of Basic authentication, the internet community defined the Digest Access Authentication scheme (rfc2617). Digest authentication avoids passing the password in clear text. Instead a checksum or digest (by default MD5) of of the username, the password, and server defined nonce value, the HTTP method, and the requested URI. The nonce is uniquely generated each time a 401 response is made. While this is better than Basic, it is not entirely secure. The hash function generates a different opaque value different nonces, request paths, and http methods. This helps mitigate some playback attacks.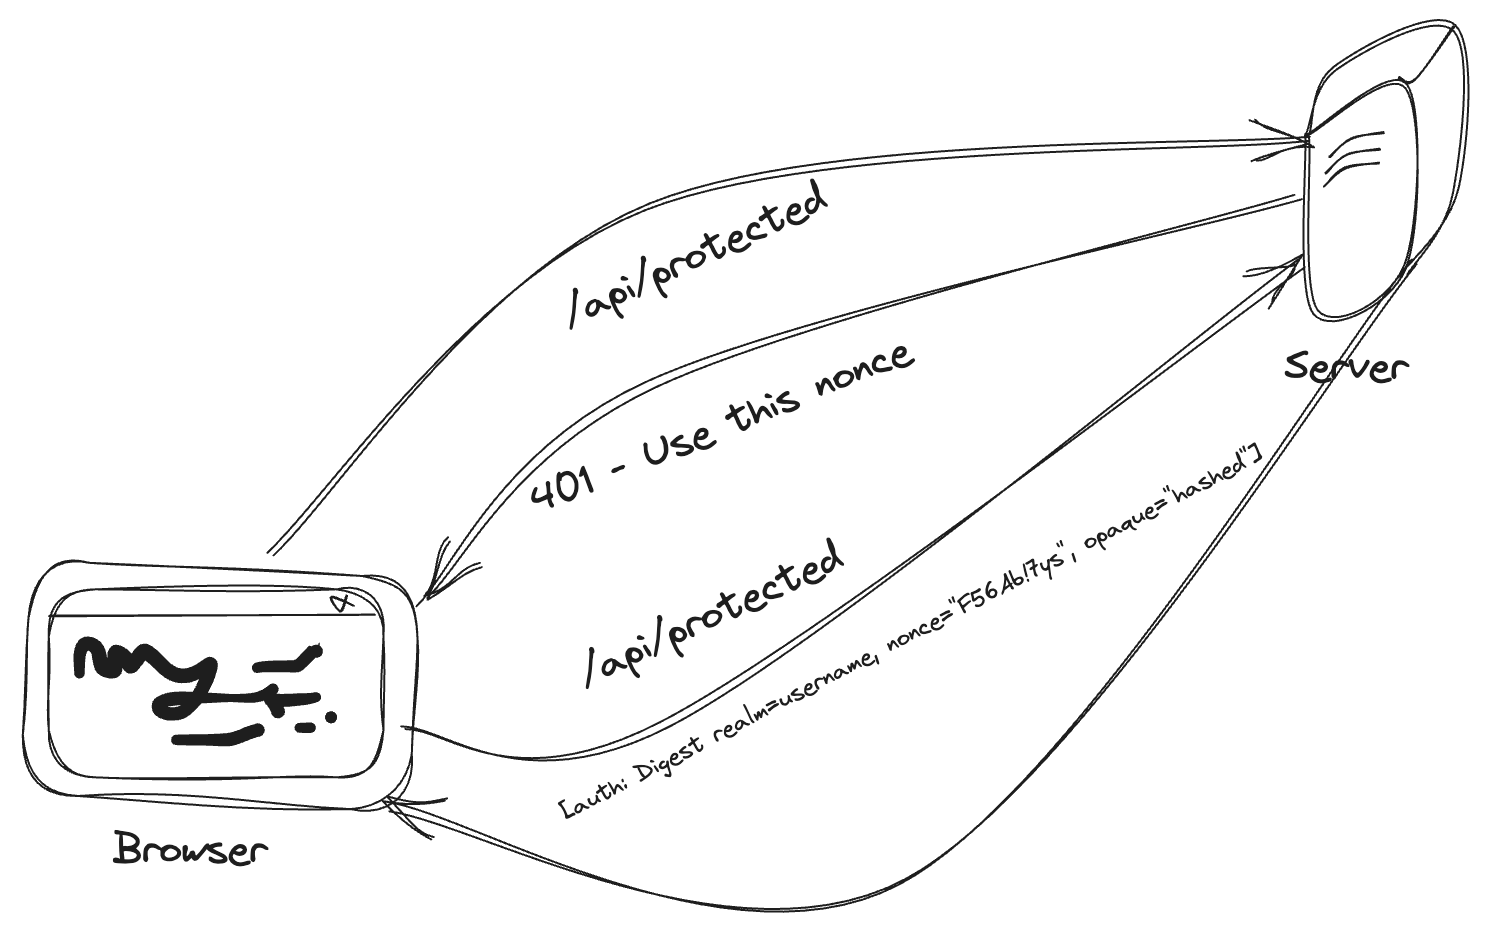
Diagram 3: Digest Authentication Scheme exhanges
Side note: A playback attack (replay attack) is an attack in which a malicious entity eavesdrops on the communication and sends the recorded authentication header as-is without the need to understand or modify the content.
Diagram 4: Playback attack Source: Wikipedia

While it is better than Basic, the Digest authentication comes with a couple of issues. It is not stateless as it requires the nonce to be server-generated. This is especially relevant for stateless HTTP APIs (commonly referred to as REST even when they are not RESTful) that would become much slower with the additional roundtrip. The other problem is that the digest remains the same across requests to the same HTTP method and request URI as long as the nonce from the server has not changed. Hence, there is a window of time where a malicious attacker can use a recorded opaque to send malicious messages. In other words, the digest cannot be used as an integrity check.
The internet never sleeps and thus we (as if I helped) came up with another way to make it more secure. Message Authentication Code is the way to verify the integrity of messages sent over the wire. I will explain the more specific type of MAC, HMAC. HMAC adds on and re-organizes the digest authentication in important ways.
HMAC still requires pre-shared keys as with other mechanisms. It uses a similar technique as a digest to hide the password in that the secret key (password) is only used in deriving the authentication code. However, instead of a server-generated nonce, we will be d the key from the contents of the request. A typical HMAC function will use a hash function (SHA-256 for example) and generate a checksum/signature that contains important parts of the request. It can looks something like this **Hash**(secret + **Hash**(secret + request_uri + post_data + http_method + timestamp)). The data that is part of the checksum needs to be pre-communicated. By adding values that are unique and expire quickly (here: the timestamp), the checksum can be made effective in making the integrity check reliable.
How Pre-Signed Requests Works
AWS SigV4 is an implementation of the HMAC authentication. As you probably already know you get AWS programmatic credentials in the form of an Access Key, Secret Access Key, and optionally for temporary credentials a Security Token. When sending a request to AWS’s APIs, you create a signature derived from the Endpoint specification, Action, Action parameters, Date, and Authentication information. If you are using the AWS SDK or the CLI, you will not need to do this yourself. This is happening behind the scenes. You can refer to the AWS Documentation for more information on how the signature is calculated.
Because the signature is made unique for a combination of parameters such as HTTP Verb, Query string and headers passed along the timestamps when the signature is generated. This is HMAC at work. At the receiving end, AWS will fetch the secret key using the Access Key provided in the request. AWS will run the same algorithm on the request and calculate the signature. A matching signature will tell AWS that the request has not been tampered with, it is not a signature copied from an older request, and the requester has valid credentials.
Every request sent to an AWS endpoint requires a signature that is calculated as above. It is usually sent in the Headers sections. However, it can also be sent as part of the query strings. Since the signature is irreversible and does not expose the secret key, it is safe to share. If you would like someone to perform a specific operation on your behalf, you can share a pre-signed request.
A typical usage of this is uploading and downloading from and to S3. You generate a pre-signed S3 upload or download URL. This URL will only work to perform the given operation on your behalf without making the bucket publicly accessible. It boils down to calculating the signature using your credentials and sharing the signature. Whoever sends the request using that signature is calling AWS as if it were you.
Basic Implementation
If someone shares a pre-signed URL for sts:GetCallerIdentity, then you can execute the API call to get their identity. In effect, this becomes your verifiable token.
The Client
In the client, create a method to get the authorization token (the pre-signed URL for us) as follows.
public static String getAuthorizationHeader() {
  DefaultCredentialsProvider provider = DefaultCredentialsProvider.create();
  final Aws4Signer aws4Signer = Aws4Signer.create();

  final SdkHttpFullRequest httpFullRequest = SdkHttpFullRequest.builder()
          .host("sts.amazonaws.com").port(443)
          .protocol("https").method(SdkHttpMethod.POST)
          .putRawQueryParameter("Version", "2011-06-15")
          .putRawQueryParameter("Action", "GetCallerIdentity")
          .build();

  final SdkHttpFullRequest presign = aws4Signer.presign(httpFullRequest,
          Aws4PresignerParams.builder()
                  .awsCredentials(provider.resolveCredentials())
                  .signingName("sts")
                  .signingRegion(Region.US_EAST_1)
                  .build());

  return presign.encodedQueryParameters().orElseThrow();
}
In this method, I am creating a call to the global sts endpoint. In the `httpFullRequest` object, we are specifying what the request looks like and what parameters it will contain. Then we can pass this to the `Aws4Signer` to be signed. I am using the AWS SDK. However, if you would like to avoid that, you are able to do the same with a custom implementation. It only requires some lengthy code
Note: If you are worried about performance (as a good engineer is), signing is done completely offline as the calculation of the signature does not involve AWS.
Then when calling your endpoint, add the pre-signed uri as a header to the http request. In Spring RestTemplate, you can do it as such.
new RestTemplate()
	    .exchange(
	        RequestEntity.get(URI.create("https://example.com/api/echo"))
	            .header("Authorization", getAuthorizationHeader())
	            .build(),
	        String.class);
On Your Server
On your server, you need to get the authorization header and call the endpoint. This code is typically part of you security filter. I’m using Javascript to verify this. I originally wrote this solution to run in an AWS lambda function as a lambda authorizer. You can do a similar thing for Spring Security or any other framework.
const query = new URLSearchParams(authHeader);
if (query.get('Action') !== 'GetCallerIdentity') {
    throw "I know what you maybe trying to do, we are not going there"
}

const options = { hostname: 'sts.amazonaws.com', path: '/?' + query, method: 'POST', headers: {'Accept': "application/json"} };

return req(options) //req is a function I copied from here > https://gist.github.com/ktheory/df3440b01d4b9d3197180d5254d7fb65
    .then(({body}) => {
        const principal = body.GetCallerIdentityResponse.GetCallerIdentityResult.Arn;
        const account = body.GetCallerIdentityResponse.GetCallerIdentityResult.Account;

        return isAllowed(account, principal, requestedPath)
    })
    .catch(response => {
        console.log("Failed", response)
        return false
    })
Note: I am defining the host as sts.amazonaws.com and not receiving a full url from the client. We wouldn’t want to call an attacker-controlled host. Hence, it is important to only accept the query string from the client. If the client sends a rogue string, we trust AWS to handle it.
The auth header contains the query string part of the request from our client. We will now execute the HTTP call to AWS. If we get a valid response (like the JSON shown above), we now know that AWS has verified that the pre-signed request is valid and that it was signed by amanuel.mekonnen while assuming a role called TestRole. We also know the AWS account 123456789. The logic to allow or deny the request can be evaluated based on these details.
What is missing?
The above implementation has some gaps. For some low-stake situations, it is sufficient as long as you are in a secured connection (HTTPS for example) and you do not log passwords.
When the stakes are high, you should know that the basic approach is susceptible to the infamous playback attack. The pre-signed request is valid for a long period of time (as long as the assumed role is valid). That means, once an attacker gains access to this header, multiple calls can be made to our endpoint impersonating poor amanuel.mekonnen (shoot him a message on LinkedIn BTW).
How do we improve this?
We need to make sure the signature expires quickly and that it is unique to requests. For that, we can leverage the query string to be more specific. AWS can be instructed to take more parameters into consideration when validating the signature. Taking advantage of that, here is a modified version of my code that add integrity check.
public static String getAuthorizationHeader(String requestedPath) {
  DefaultCredentialsProvider provider = DefaultCredentialsProvider.create();

  final Aws4Signer aws4Signer = Aws4Signer.create();

  final SdkHttpFullRequest httpFullRequest = SdkHttpFullRequest.builder()
          .host("sts.amazonaws.com")
          .port(443)
          .protocol("https")
          .putRawQueryParameter("Version", "2011-06-15")
          .putRawQueryParameter("Action", "GetCallerIdentity")
          .putRawQueryParameter("X-Auth-Timestamp", String.valueOf(Instant.now(Clock.systemUTC()).getEpochSecond()))
          .putRawQueryParameter("X-Auth-Path", requestedPath)
          .method(SdkHttpMethod.POST)
          .build();

  final SdkHttpFullRequest presign = aws4Signer.presign(httpFullRequest,
          Aws4PresignerParams.builder()
                  .awsCredentials(provider.resolveCredentials())
                  .signingName("sts")
                  .signingRegion(Region.US_EAST_1)
                  .build());

  log.info("Pre-signed {}", presign.getUri());

  final byte[] base64 = Base64.getEncoder()
          .encode(presign.encodedQueryParameters().orElseThrow().getBytes(StandardCharsets.UTF_8));

  return new String(base64, StandardCharsets.UTF_8);
}
Note: I have also encoded the result into Base64 to make it look more token-like.
Now with that modification in place in the client, we can validate a couple of more items in our security filter. We will verify that the requested path matches as well as that the signature was not made too long ago. More variables can be added to your liking.
const query = new URLSearchParams(Buffer.from(authHeader, 'base64').toString('utf8'););
if (query.get('Action') !== 'GetCallerIdentity') {
    throw "I know what you maybe trying to do, we are not going there"
}

if (query.get('X-Auth-Path') !== requestedPath) {
    throw "Tempering detected, I got you"
}

const currentEpochSeconds = Math.floor((new Date()).getTime() / 1000);
if ((currentEpochSeconds - query.get('X-Auth-Timestamp')) > 10) {
    throw "It has been over a while or two since this request was signed."
}

const options = { hostname: 'sts.amazonaws.com', path: '/?' + query, method: 'POST', headers: {'Accept': "application/json"} };

return req(options) //req is a function I copied from here > https://gist.github.com/ktheory/df3440b01d4b9d3197180d5254d7fb65
    .then(({body}) => {
        const principal = body.GetCallerIdentityResponse.GetCallerIdentityResult.Arn;
        const account = body.GetCallerIdentityResponse.GetCallerIdentityResult.Account;

        return isAllowed(account, principal, requestedPath)
    })
    .catch(response => {
        console.log("Failed", response)
        return false
    })
Note: The more specific the parameters are the less surface there is to do a playback attack. You can go further and make each request unique by generating a random value that would be shared through the headers.
Conclusion
In the blog, I’ve discussed some key concepts such as the Basic Authentication Scheme, Digest Authentication Scheme, and HMAC. Working on top of our knowledge of how that works, we have discussed how AWS used HMAC and how we can utilize the pre-signed uri to act as a proxy for identifying a client’s IAM identity. We have also touched up on how we can enhance it to mitigate man-in-the-middle attacks, more specifically playback attacks.
The basic solution is suitable for most scenarios running in a secure context such as HTTPS. If passwords are leaked into your logs, however, it is vulnerable to exploits by whoever can read these logs. You can mitigate these by adding the improvements I suggested to support integrity checks with virtually no additional cost.
I will follow up with a smaller blog to show a more specific example including code on how to implement it on your API Gateway. In the meantime, If you have suggestions on how it can be improved or even how it may be done better, please reach out.