

Imagine assembling a jigsaw puzzle. Each piece must fit perfectly to reveal the complete picture. Similarly, in the world of software, linting and formatting ensure every “code piece” fits perfectly together, making the software robust and efficient. Let me guide you through our journey of integrating these processes into a project in AWS CodePipeline.
Why Linting and Formatting are Indispensable
Code Quality is paramount. It’s not just about preventing errors; it’s about ensuring consistency, readability, and efficient collaboration. As teams grow, maintaining this quality becomes challenging. Enter linting and formatting - tools that become our first line of defense against inconsistencies and potential errors.
A Snapshot of Our Development Stack
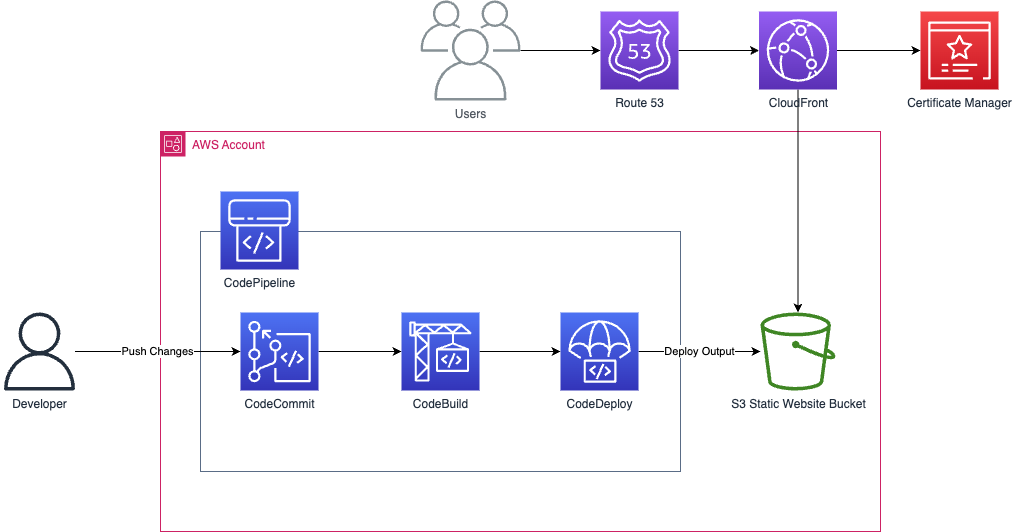
Before I dive into the details, let’s start with a brief overview of our development stack. We used AWS CodePipeline for the CI/CD pipeline, AWS CodeCommit for the version control system, and AWS CDK for the Infrastructure as Code (IaC). The website was to be deployed with AWS S3 static website hosting, and AWS CloudFront distribution for content delivery.
Architectural Diagram
Integrating Linting: Where and How?
There are three main stages where linting could be integrated into the development pipeline:
- In the Editor: This provides immediate feedback but relies heavily on individual developer setups.
- Git Hooks: This ensures standardized checks at some point before code merges.
- CI/CD Pipeline: A fail-safe ensuring nothing bypasses our checks.
Exploring Server-Side Hooks
We first considered server-side hooks. These are specialized scripts that spring into action after a code push to the remote repository.
Among the hooks available in this group, our attention was particularly drawn to the Pre-receive hook. This unique hook functions as a gatekeeper, activating right before the code push is accepted. The success of the git push operation hinges on the successful validation of the script; if it validates, the push proceeds, if not, it’s halted right in its tracks.
Below is a visual representation detailing the steps that get triggered when a developer commits to the repository.

Within GitLab, while server-side hooks provide an extensive range of options, nuances arise in their implementation and maintenance. Comparatively, GitHub’s approach, although simpler, is restricted to their Enterprise tier.
Our AWS-aligned ecosystem had us researching the possibility to implement this in AWS CodeCommit. However, the lack of native support for server-side hooks had us reconsider our strategy.
The Shift to Pre-Commit Hooks
Incorporating linting checks at the pre-commit stage ensures that code is validated even before it’s pushed to the repository. The following chart provides a visual flow of the sequence of steps initiated when pre-commit hooks are triggered.
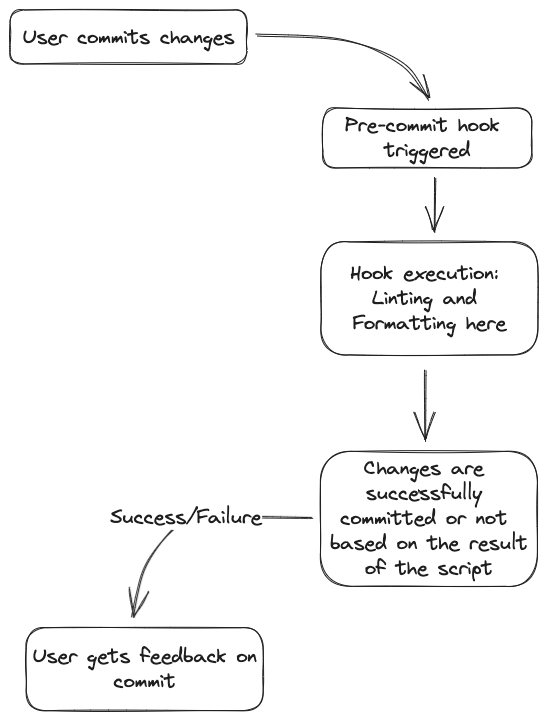
This approach aligns with the principle of catching issues early and ensuring that developers are immediately aware of any corrections or modifications to their code.
Peeking into Our Code Implementation
This is a CDK project using Python, and the linting and formatting guide used by the libraries is the PEP8 standard. We used flake8==4.0.1 for the linting and black==22.3.0 for the formatting.
The Deploy Stage
Let’s start with our deploy stage. This is where we set the AWS environment, specifying the account and region where the stack (which has already been created) will be deployed.
# Import necessary modules and classes from AWS CDK
from constructs import Construct
from aws_cdk import Stage, Environment
from .MyWebStack import SampleStack

# Define the DeployStage class, which is a subclass of the AWS CDK Stage class
class DeployStage(Stage):
	def __init__(self, scope:Construct, id:str, **kwargs):
		super().__init__(scope, id, **kwargs)
		# Create a new instance of the SampleStack Stack where the infrastructure is defined
		SampleStack(
			self,
			"SampleService",
			# Specify the AWS account and region where the stack will be deployed
			env=Environment(account="12XXXXXXXXXX90", region="eu-central-X")
		)
The Pipeline Stack
Next, let’s delve into the Pipeline Stack. Here we define our AWS CodePipeline, which includes a reference to our AWS CodeCommit repository and the steps to be executed in the pipeline.
# Import necessary modules and classes from AWS CDK
from aws_cdk import pipelines, Stack, aws_codecommit as codecommit
from .PipelineStages import DeployStage

# Define the PipelineStack class, which is a subclass of the AWS CDK Stack class
class PipelineStack(Stack):
	def __init__(self, scope: Construct, id: str, **kwargs):
		# Call the constructor of the parent class
		super().__init__(scope, id, **kwargs)
		# Create a reference to an existing AWS CodeCommit repository
		repo = codecommit.Repository.from_repository_name(self, id="TestPipelineRepo", repository_name="test-pipeline")
		# Create a new AWS CodePipeline
		pipeline = pipelines.CodePipeline(
			self,
			id="TestPipeline",
			# Define the steps to be executed in the pipeline
			synth=pipelines.ShellStep(
			id="Synth",
			# Specify the source of the code that will be used in the pipeline
			input=pipelines.CodePipelineSource.code_commit(repository=repo, branch="main"),
			install_commands=["npm i -g npm@latest"],
			commands=[
				"make install",  # Install necessary dependencies
				"make lint",     # Run linting checks using flake8 . --exclude=*.pyc,.venv/,.pytest_cache/,__pycache__/, cdk.out --max-line-length 80
				"make synth"     # Generate CloudFormation template
			],
			),
		)
		# Create a new instance of the DeployStage class and add it to the pipeline
		deploy = DeployStage(self, id="Deploy")
		pipeline.add_stage(deploy
The Pre-commit Hook
To set up the pre-commit hook you have to navigate to the hooks directory of your git project. This can be found in ./.git/hooks/. The .git directory is usually hidden by default in case you are wondering why you can’t find it, remember you have to enable ‘view hidden files’ in file browser or run ls -a in your terminal.
In this hooks directory you will see sample hooks that have been bootstrapped with your repo, but if you want them to run you need a copy without the .sample extension at the end. Instead of pre-commit.sample, you want a file that is just pre-commit. You can set up your pre-commit commands here.
Next, you must navigate to your hooks directory in your terminal (if you were not already using your terminal) and make the pre-commit file executable using this command:
chmod +x pre-commit .
There are third party libraries that can help with configuring hooks, but this here is a good option if you need just this one time setup.
Finally, let’s examine our pre-commit hook. This script is run before every local commit in this repository, helping to ensure code quality by automatically formatting the code and adding all changes to the stage for commit.
#!/bin/bash

# Run the command to install necessary dependencies
make install

# Run the command to format the code using black .
make fmt

# Stage all changes for commit
git add .

# Echo a message to the console
echo "pre-commit: make fmt"

# End the script with a status of 0 to indicate success
exit 0
Wrapping Up
Integrating linting and formatting into your development workflow is crucial for maintaining code quality. Our journey to integrate linting and formatting into our development pipeline was paved with trials, explorations, and ultimately, insightful revelations. It led us to explore various options, including server-side Git hooks, but we encountered challenges specific to our development environment and proposed collaboration culture. The combination of pre-commit hooks and additional checks in the CI pipeline emerged as the optimal solution.
Have you had a similar experience? Feel free to share your thoughts and questions in the comments below. After all, shared knowledge propels the tech community forward.
Stay Connected
If you have questions, are looking for more insights, or wish to discuss potential collaborations, We’re here to help. Your feedback and inquiries are always welcome.