

Principle of least privilege
If you’ve been working with security or cloud or security in the cloud related to SaaS applications, you probably already know about the principle of least privilege. Simply put, it states that each entity and tenant must be able to access only the information and resources necessary for its legitimate purpose.
As simple as it sounds, adhering to this principle can be challenging in SaaS environments. There are multiple ways and levels in which you can apply this principle. My last article was about strategies to isolate the compute and data resources to achieve tenant isolation and access restriction, but isolating shared resources when employing pooled or bridge models of cloud resource allocation can get tricky.
Access control for shared resources in SaaS applications
There are many reasons for building SaaS applications using the pooled or bridge model. For example, you might want to use a single S3 bucket for storing objects for all tenants instead of creating a dedicated bucket for each tenant and risk running out of the quota (currently 100 buckets per account). Similarly, you might want to access items from a single DynamoDB table instead of provisioning a new table for each tenant.
In such a case, it’s normal for developers to grant access to the entire bucket or table. As a result, tenant isolation is hard-coded in the program that accesses these resources. This is done to ensure that the program only allows requests to the objects corresponding to the current tenant. While this solution may work, relying on the developers to impose the principle of least privilige and by giving access only to the relevant items in good faith is not the most efficient way to isolate tenants and their data in SaaS applications. It is especially true if you are in a regulated industry with strict security and compliance requirements. There are much better ways to embed such fine-grained access control. Let’s discuss one such approach.
TL;DR
If you’re already familiar with the AWS services discussed later in the article, here’s the approach in a nutshell. Continue reading if the following steps aren’t clear yet.
To provide a fine-grained access control:
- Configure a Cognito Identity Pool to allocate an IAM role to authenticated users to prevent an unauthorised cross-tenant access.
- Configure Identity Pool to tag user sessions with OpenID claims using the “Attributes for access control” feature to provide the SaaS application with necessary user context.
- Use Principal Tags inside the permission policies of the IAM role to restrict access to resources that don’t belong to the current tenant.
- To access resources on behalf of a user, exchange the identity for credentials using Identity Pool and use these credentials to access resources.
Scenario
Let’s consider a scenario to help us better understand the approach we will shortly discuss.
Imagine you are building a multi-tenant SaaS application that allows its users to store and retrieve objects to and from a pooled S3 bucket. Your application also allows the users to store some configurations as key/value pairs to a specific shared DynamoDB table.
You are using the Amazon Cognito User Pool for authentication and authorization to the endpoints of your API Gateway.
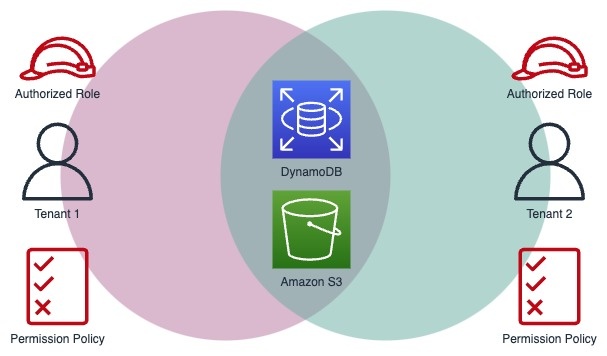
Basically, when a user calls your API, they provide an authorization header used by the Cognito User Pool to authenticate the user. After authentication, the API invokes a lambda that, based on the request payload, allows the user to perform certain operations on an S3 bucket and DynamoDB table within the current tenant’s scope. All tenants of the application share the same bucket and table.
The objective is to ensure that, instead of having access to the entire bucket or table, each user only has access to specific objects and items allocated for them within the tenant scope.
Amazon Cognito Identity Pools
One important service that can help us achieve this fine-grained access control is Amazon Cognito Identity Pools.
An identity pool can be linked to your identity provider (Amazon Cognito User Pool in our case) and then be used to allocate an IAM role to an authenticated user. The way it works is that you can configure an IAM role as the “Authenticated Role” that can be assumed by the authenticated users.
For our scenario, this role will have permission policies to grant access to the S3 bucket and the DynamoDB table. Once the user authenticates to your service via the Cognito User Pool, you can use the identity token provided by the user pool and exchange it for temporary AWS credentials. With these credentials, you can have your service assume the Authenticated Role and access the protected resources.
Permission Policy for S3
{
    "Version": "2012-10-17",
    "Statement": [
        {
            "Sid": "VisualEditor0",
            "Effect": "Allow",
            "Action": [
                "s3:PutObject",
                "s3:GetObject"
            ],
            "Resource": "arn:aws:s3:::BUCKET_NAME/*"
        }
    ]
}
Permission Policy for DynamoDB
{
    "Version": "2012-10-17",
    "Statement": [
        {
            "Sid": "VisualEditor0",
            "Effect": "Allow",
            "Action": [
                "dynamodb:PutItem",
                "dynamodb:DeleteItem",
                "dynamodb:GetItem",
                "dynamodb:UpdateItem"
            ],
            "Resource": "arn:aws:dynamodb:REGION:ACCOUNT_ID:table/TABLE_NAME"
        }
    ]
}
If you are wondering how exactly it provides fine-grained access, that’s because it doesn’t…yet. With these policies in place, an authenticated user will still have access to all the objects inside the S3 bucket and all the items inside the DynamoDB table, via our application. At this point, one might stop relying on policies to restrict access and instead rely on the code to access the correct object or item. Let’s take this solution further to restrict object access at the policy level.
Tag user session with claims
Amazon Cognito Identity Pool allows you to create key-value attributes using the claims from your identity provider and tag the current user session using these tags.
In the example below, you can see the default claim mapping that tags each user session with “username:sub” where sub is the Subject claim of OpenId and is usually a unique key that you can use to identify individual users.

Make sure to update the trust policy of the authenticated IAM role as shown below for this mapping to work.
{
    "Version": "2012-10-17",
    "Statement": [
        {
            "Effect": "Allow",
            "Principal": {
                "Federated": "cognito-identity.amazonaws.com"
            },
            "Action": [
                "sts:AssumeRoleWithWebIdentity",
                "sts:TagSession"
            ],
            "Condition": {
                "StringEquals": {
                    "cognito-identity.amazonaws.com:aud": "IDENTITY_POOL_ID"
                },
                "ForAnyValue:StringLike": {
                    "cognito-identity.amazonaws.com:amr": "authenticated"
                }
            }
        }
    ]
}
With this configuration, you can distinguish between the various user sessions, established using the temporary credentials and provided by the Identity Provider. You can map each session to individual users even though they all assume the same authenticated role. It is crucial for the next part as we’ll update the previously listed permissions slightly to restrict access to only the objects and items that belong to or correspond to the current user.
Updated Policies
Updated Permission Policy for S3
Amazon S3 has a flat structure instead of a hierarchy. However, it can mimic the concept of a folder using a shared name prefix. For example, you can group two separate objects by simply naming them “GROUP_1/OBJ_1” and “GROUP_1/OBJ_2” where “GROUP_1” is the prefix and “OBJ_X” is the name of the individual object.
You can leverage this to provide fine-grained access control to your tenants by grouping all the objects belonging to a user under the same username prefix and modifying the “Resource” attribute of your S3 permission policy as shown below.
{
    "Version": "2012-10-17",
    "Statement": [
        {
            "Sid": "VisualEditor0",
            "Effect": "Allow",
            "Action": [
                "s3:PutObject",
                "s3:GetObject"
            ],
            "Resource": "arn:aws:s3:::BUCKET_NAME/${aws:PrincipalTag/username}/*"
        }
    ]
}
The above policy ensures that users can access only the object group with the same prefix as the username used to tag the current session. It makes it impossible for any service that has assumed the authenticated role to access S3 objects with a different username prefix.
Updated Permission Policy for DynamoDB
DynamoDB has the concept of a partition key that can identify the items inside a table for an individual tenant. You can also have a partition-key and a sort-key to create a composite primary key. For example, if you are storing the app-specific configurations for each user inside a DynamoDB table, you can have a composite key made up of username as the partition key and app name as the sort key. This way, the table will look something like the one below.

Once you introduce a username partition key, you can modify the DynamoDB policy of the authenticated IAM role to include a condition. This ensures that the services that assume this role have access to only the items whose partition key matches the username tag of the current session. The same approach can be taken in order to implement a tenant specific access control.
{
    "Version": "2012-10-17",
    "Statement": [
        {
            "Sid": "VisualEditor0",
            "Effect": "Allow",
            "Action": [
                "dynamodb:PutItem",
                "dynamodb:DeleteItem",
                "dynamodb:GetItem",
                "dynamodb:UpdateItem"
            ],
            "Resource": "arn:aws:dynamodb:REGION:ACCOUNT_ID:table/TABLE_NAME",
            "Condition": {
                "ForAllValues:StringEquals": {
                    "dynamodb:LeadingKeys": "${aws:PrincipalTag/username}"
                }
            }
        }
    ]
}
Conclusion
Applying the principle of least privilege requires extra care when sharing resources among multiple tenants of a SaaS application. Knowing how to allocate IAM roles to authenticated users and tagging the user session with claims, provides us fine-grained control over resource access. In this article we explored how to use this method to share the same S3 bucket and DynamoDB table. The same technique can be applied to control access to several AWS services.
If you found this post insightful let’s continue this journey of growth and success together!